How to Build a Real-Time AI RAG Pipeline
In this guide, we will build a complete, end-to-end Retrieval-Augmented Generation (RAG) system using Conduit. This powerful pipeline will automatically ingest new documents, process them into a queryable format, and make them available to a chatbot UI, ensuring your knowledge base is always up-to-date.
You can find the complete code and all configuration files for this guide in the Conduit AI Pipelines repository on GitHub.
Part 1: Introduction and Architecture
This first part introduces the problem we aim to solve and gives a high-level overview of the solution's architecture.
The Problem
The number of new research papers published on topics like Artificial Intelligence is overwhelming, making it difficult to keep current with the latest information. Our goal is to build an automated system that ingests these papers (in PDF format) and allows a user to ask questions about them using a natural language interface, like a chatbot.
This system should be fully automated; as new papers are published, they should be processed and integrated into the knowledge base without manual intervention, ensuring the chatbot's answers always use the latest information available.
The Solution
The final application consists of an open-source chatbot UI that interacts with a custom assistant. This assistant has access to the knowledge base created and maintained by our Conduit pipeline. When a user asks a question, the chatbot provides an answer and cites the source documents used to generate the response.
A key feature of the system is its ability to update in real-time. The Conduit pipeline runs continuously in the background, detecting and processing new documents as they are added to the source.
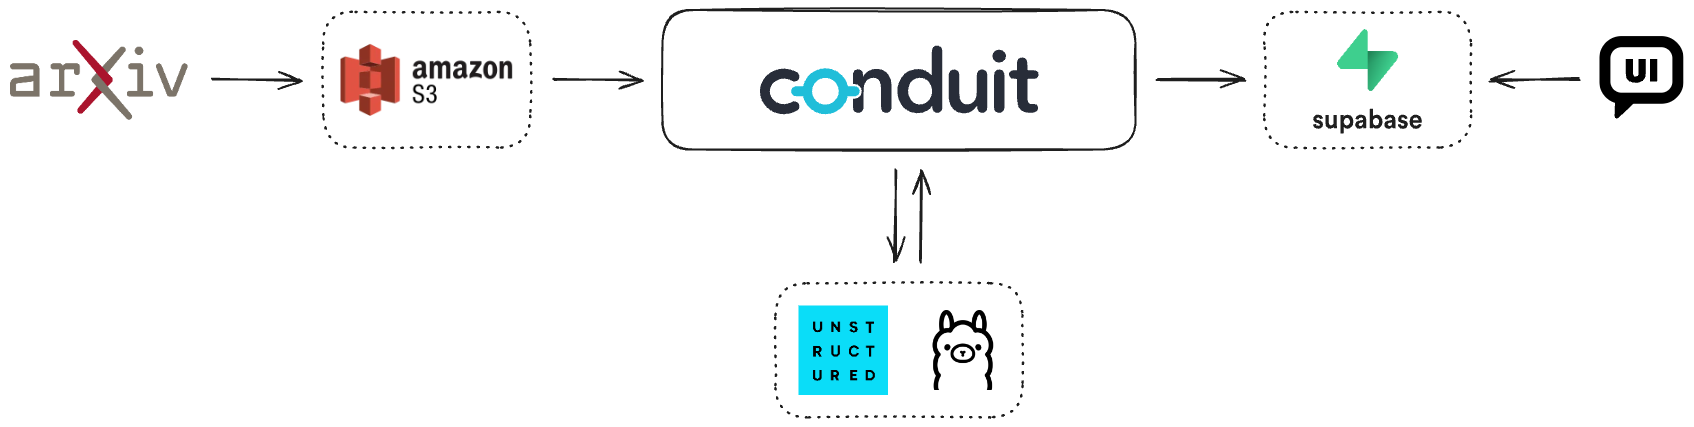
The Architecture
The entire system is orchestrated by Conduit, which connects various components to create a seamless data flow.
-
ArXiv: Research papers are originally published on sites like ArXiv. A script will be used to fetch these papers and upload the PDFs to an Amazon S3 bucket, which will act as the primary source for our pipeline.
-
Amazon S3: We will use an S3 bucket to store the PDF files. This bucket will be monitored by our Conduit pipeline for new documents.
-
Conduit Pipeline: This is the core of the system.
- Source (S3): Conduit has a built-in S3 source connector that we'll use to detect new PDFs using Change Data Capture (CDC).
- Processors: A chain of processors will transform the raw PDF data. This
involves two key external services:
- Unstructured.io: A Python library used for extracting text from the PDFs and partitioning it into smaller, manageable chunks. We will interact with it via a custom HTTP server.
- Ollama: A tool that runs Large Language Models
(LLMs) locally. We will use it to generate vector embeddings for each
text chunk using the
all-minilm:l6-v2model.
- Destination (Postgres): Since Supabase is essentially a Postgres database under the hood, we will use the built-in Postgres destination connector to load the final, processed data into a Supabase database.
-
Supabase: The processed data, including the text chunks and their embeddings, is stored in a Supabase database used by Chatbot UI.
-
Chatbot UI: The chatbot interface queries the Supabase database to retrieve the relevant information needed to answer user questions.
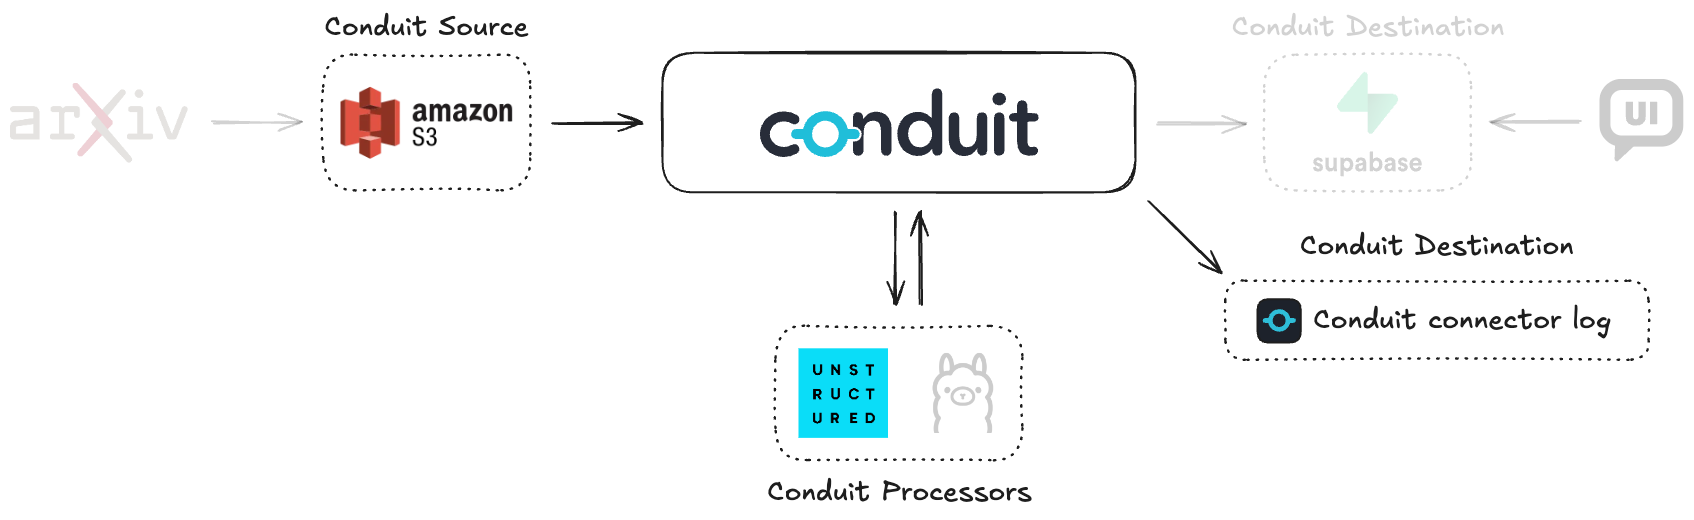
Part 2: Reading from Amazon S3
In this section, we will build the first version of our pipeline. It will use the S3 source connector to read documents and a log destination connector to inspect the raw data.

1: Prerequisites
Start by installing Conduit on your machine. The easiest way to do this is using this command:
curl https://conduit.io/install.sh | bash
For more information and other methods, refer to the Installing and running page.
You will also need an Amazon S3 bucket to store the PDF files. You can create one using the AWS Management Console or the AWS CLI. See the official documentation for more information. Make sure you note the access key, secret key, region and bucket name, as you will need these credentials to configure the pipeline.
2: Initialize Your Conduit Project
First, create a dedicated directory for your project and initialize it using the Conduit CLI.
mkdir ai-showcase
cd ai-showcase
conduit init
This command creates the necessary directory structure for a Conduit project,
including a pipelines directory.
3: Create the Pipeline Configuration
Next, initialize a pipeline that connects an
s3 source to a
log destination. We'll give the pipeline
the name ai-showcase for easy reference. This command will create a file named
ai-showcase.yaml in the pipelines directory with the basic structure of a
Conduit pipeline.
conduit pipelines init ai-showcase --source s3 --destination log
At this point your directory structure should look like this:
ai-showcase/
├── conduit.yaml
├── connectors/
├── pipelines/
│   └── ai-showcase.yaml
└── processors/
Alternatively, you can use the file
destination connector instead of the
log connector. This will write the raw
records to a file, which can be easier to inspect. If you choose this option,
update the pipelines/ai-showcase.yaml file to replace the log destination
with a file destination:
- id: file-destination
  type: destination
  plugin: file
  settings:
    path: "records.json" # This will create a file in your project directory
4: Configure Connectors and Environment Variables
The pipeline needs to be configured to connect to your S3 bucket. Conduit requires credentials like an access key and secret key. To avoid hardcoding these secrets, we will use environment variables.
-
Update the pipeline YAML file located at
pipelines/ai-showcase.yamland modify thes3-sourceconnector settings to use environment variables.version: "2.2"
pipelines:
- id: ai-showcase
status: running
name: ai-showcase
connectors:
- id: s3-source
type: source
plugin: s3
settings:
aws.access_key_id: ${AWS_ACCESS_KEY_ID}
aws.secret_access_key: ${AWS_SECRET_ACCESS_KEY}
aws.region: ${AWS_REGION}
aws.bucket: ${AWS_BUCKET}
- id: log-destination
type: destination
plugin: log
settings:
level: info -
Create a
.envfile in your project directory to store your credentials.export AWS_ACCESS_KEY_ID="YOUR_AWS_ACCESS_KEY"
export AWS_SECRET_ACCESS_KEY="YOUR_AWS_SECRET_KEY"
export AWS_REGION="us-east-1"
export AWS_BUCKET="your-s3-bucket-name" -
Source the environment variables into your shell session so Conduit can access them.
source .env
5: Run and Test the Pipeline
Now, run the pipeline:
conduit run
Conduit is now monitoring your S3 bucket for changes. To test it, upload a file to the bucket. As soon as the file is uploaded, you will see a long string appear in the Conduit logs. This is the raw content of the PDF file, printed as a base64 encoded string, confirming that the pipeline is successfully reading from S3.
In the next part, we'll add processors to transform this raw data into a structured format.
Part 3: Chunking Documents with Processors
The raw data from S3 is unstructured. In this part, we'll add a series of processors to partition the PDF content into smaller chunks using the unstructured.io library.
1: Set Up the Unstructured.io Service
Since the official Unstructured Docker image provides the Python library but not
an HTTP server, we've created a simple server to bridge this gap. This server
exposes a POST /unstructured/partition endpoint that allows Conduit to send
PDF data and receive structured chunks in return.
You can inspect and run this service using the Docker image provided in the project's GitHub repository.
The custom server expects the incoming data to be base64-encoded, which is why our processor chain will include an encoding step.
Once the server is running, add its address to your .env file:
export UNSTRUCTURED_ADDRESS="127.0.0.1:8089" # Use the correct host and port
Remember to source the file again with source .env.
2: Add Processors for Chunking
We will now add a chain of processors to our pipeline to handle the chunking
process. Add the following processors section to your
pipelines/ai-showcase.yaml:
    processors:
      # Encode the raw PDF data to base64
      - id: base64
        plugin: "base64.encode"
        settings:
          field: ".Payload.After"

      # Send the data to the Unstructured service
      - id: unstructured-partition-request
        plugin: "webhook.http"
        settings:
          headers.content-type: "application/json"
          request.body: '{"data":{{ printf "%s" .Payload.After | toJson }}}'
          request.method: "POST"
          request.url: "http://${UNSTRUCTURED_ADDRESS}/unstructured/partition"
          # Reponse will contain {"chunks": ["text-chunk1","text-chunk2",...]}
          response.body: ".Payload.After"

      # Decode the JSON response from the service
      - id: unstructured-partition-decode-json
        plugin: "json.decode"
        settings:
          field: ".Payload.After"
This chain works as follows:
base64.encode: Takes the raw data from.Payload.Afterand encodes it.webhook.http: Sends the encoded data to our custom Unstructured server. The response from the server, which contains the chunks, overwrites the content of.Payload.After.json.decode: Parses the JSON response, transforming it into a structured object that Conduit can work with.
3: Run and Verify the Chunks
Run the pipeline again with conduit run and upload a PDF to your S3 bucket.
Now, inspect the destination record. You will see that the .Payload.After
field contains a structured object with a chunks key, which holds an array of
text extracted from the PDF.
Part 4: Creating Vector Embeddings
With our documents chunked, the next step is to generate vector embeddings for each chunk. This will allow our LLM to understand the semantic meaning of the text.
1: Set Up Ollama
For this guide, we use Ollama to run an LLM locally and generate embeddings.
-
Install Ollama: Follow the instructions on the official Ollama website.
-
Pull the necessary models: We need one model for generating embeddings (
all-minilm:l6-v2) and another for the final chat functionality (deepseek-r1:8b).ollama pull all-minilm:l6-v2
ollama pull deepseek-r1:8bYou can verify the installation with
ollama list. -
Run the Ollama server: Start the server with
ollama serve. By default, it runs onhttp://localhost:11434. -
Set the environment variable: Add the Ollama server address to your
.envfile and source it.export OLLAMA_ADDRESS="127.0.0.1:11434"source .env
2: Add Processors for Generating Embeddings
We'll add two more processors to our pipeline to call the Ollama API and handle its response.
      # ... add to the end of the processors list
      # Send chunks to Ollama to get embeddings
      - id: ollama-embed-request
        plugin: "webhook.http"
        settings:
          request.body: '{"input": {{toJson .Payload.After.chunks}}, "model":"all-minilm:l6-v2"}'
          request.url: "http://${OLLAMA_ADDRESS}/api/embed"
          request.method: "POST"
          # Response will contain {"embeddings": [[0.1, 0.2, ...], [0.3, 0.4, ...], ...]}
          response.body: ".Payload.After.embeddings"

      # Decode the embeddings from the response
      - id: ollama-embed-decode-json
        plugin: "json.decode"
        settings:
          field: ".Payload.After.embeddings"
After running this, the record's payload will have two separate keys: chunks
and embeddings.
3: Merge Chunks and Embeddings
The final processing step is to merge the text chunks with their corresponding
embedding vectors into a single, structured array. We'll use a
custom.javascript processor for this.
      # ... add to the end of the processors list
      - id: merge-chunks-and-embeddings
        plugin: "custom.javascript"
        settings:
          script: |
            function process(rec) {
              // rec.Payload.After currently contains:
              // {
              //   "chunks": ["text-chunk1", "text-chunk2", ...],
              //   "embeddings": {
              //     "embeddings": [[0.1, 0.2, ...], [0.3, 0.4, ...], ...]
              //   }
              // }

              // We want to transform it to:
              // {
              //   "items": [
              //     {"text": "text-chunk1", "embedding": [0.1, 0.2, ...]},
              //     {"text": "text-chunk2", "embedding": [0.3, 0.4, ...]},
              //     ...
              //   ]
              // }

              const chunks = rec.Payload.After.chunks;
              const embeddings = rec.Payload.After.embeddings.embeddings;

              const formatted = chunks.map((text, i) => ({
                text,
                embedding: embeddings[i]
              }));

              // StructuredData() essentially creates a map
              rec.Payload.After = StructuredData();
              rec.Payload.After["items"] = formatted;

              return rec;
            }
4: Run and Verify the Final Structure
Run the pipeline and upload another file. Check the destination record. The
payload should now contain a single items key. This key holds an array of
objects, where each object contains a text field and its corresponding
embedding vector, ready to be loaded into our database.
Part 5: Storing Data in Supabase & Using the Chatbot
In this final part, we will complete the pipeline by connecting it to a
real-time database and user interface. We will replace the log destination
with a postgres connector to load our processed data into a Supabase instance.
This makes the data available to our Chatbot UI, bringing the entire RAG system
to life.
1: Set Up the Chatbot UI and Supabase
The frontend for our RAG system is an open-source Chatbot UI that uses Supabase as its backend. You will need to set up both components locally.
-
Clone and Install the Chatbot UI:
First, clone the forked repository which contains the necessary configurations for this project and install its dependencies.
git clone git@github.com:ConduitIO/chatbot-ui.git
cd ./chatbot-ui && \
npm install -
Install and Configure Supabase:
The Chatbot UI repository contains detailed instructions for setting up a local Supabase instance. Please follow the steps in the project's README file. This process involves installing Supabase, running database migrations, and getting the necessary credentials to connect the UI to its backend.
-
Run the Chatbot UI:
Once Supabase is configured and running, start the Chatbot UI application.
2: Configure the Postgres Destination in Conduit
Now, we need to configure Conduit to send the processed data to the Supabase database.
-
Add Supabase Credentials to
.env:Add the connection details for your local Supabase instance to your
.envfile. Supabase provides these values when you initialize the project.export SUPABASE_USERNAME=postgres
export SUPABASE_PASSWORD=postgres
export SUPABASE_ADDRESS=127.0.0.1:54322 -
Replace the Destination in
ai-showcase.yaml:In your pipeline configuration file, remove the
log-destinationand replace it with apostgresdestination.# ...
connectors:
- id: s3-source
# ... (s3 source configuration)
- id: supabase
type: destination
plugin: postgres
settings:
url: "postgresql://${SUPABASE_USERNAME}:${SUPABASE_PASSWORD}@${SUPABASE_ADDRESS}/postgres"
3: Prepare Data for the Chatbot UI Schema
The Chatbot UI requires data to be structured across several specific tables. We need to add several more processors to transform our single record into multiple records that match this schema.
First, you'll need a few static UUIDs from your Chatbot UI installation for the
user, workspace, and collection. In the forked project of Chatbot UI, we
prepared these values for you. We will use these values as environment
variables in our pipeline configuration, so we need to add them to our
.env file:
export CHATBOTUI_USER_ID=e9fc7e46-a8a5-4fd4-8ba7-af485013e6fa
export CHATBOTUI_COLLECTION_ID=17ebf136-b08d-443e-b0d0-ac45369ad31a
export CHATBOTUI_WORKSPACE_ID=0fa35765-d33f-4bc3-8421-6f0d6bb46a03
4: Add the Final Processor Chain
This final processor chain is the most complex. It takes the array of chunks and embeddings and transforms it into separate records for each of the required database tables.
The Postgres destination requires records to contain structured data and uses
each field in the .Payload.After object to populate the database columns. The
.Key field is also inserted, and it's additionally used to identify the record
in the database in case of updates.
The processors need to generate a unique ID for each file, since we need it to
link the records across different tables. The file_items table will contain
the individual text chunks and their embeddings, while the files,
collection_files, and file_workspaces tables will store metadata about the
file and its associations.
Each table has a specific structure, dictated by the Chatbot UI schema. Add the
following processors to the end of your processors list in ai-showcase.yaml
to prepare the records accordingly.
      # ... after merge-chunks-and-embeddings processor

      # Generate a unique ID for the file
      - id: generate-id
        plugin: "custom.javascript"
        settings:
          script: |
            function process(rec) {
              rec.Metadata["file_id"] = uuidv4();
              return rec;
            }

            function uuidv4() {
              return 'xxxxxxxx-xxxx-4xxx-yxxx-xxxxxxxxxxxx'.replace(/[xy]/g, function(c) {
                var r = Math.random() * 16 | 0;
                var v = c === 'x' ? r : (r & 0x3 | 0x8);
                return v.toString(16);
              });
            }

      # Split the single record into multiple records, one for each item
      - id: split-items
        plugin: "split"
        settings:
          field: ".Payload.After.items"

      # Prepare the records for the 'file_items' table
      - id: prepare-file-items-record
        plugin: "custom.javascript"
        settings:
          script: |
            function process(rec) {
              rec.Metadata["opencdc.collection"] = "file_items";

              data = StructuredData();
              data["file_id"] = rec.Metadata["file_id"];
              data["user_id"] = "${CHATBOTUI_USER_ID}";
              data["content"] = rec.Payload.After.items.text;                              // The text content of the file item
              data["local_embedding"] = JSON.stringify(rec.Payload.After.items.embedding); // The local embedding of the file item, JSON representation
              data["tokens"] = rec.Payload.After.items.text.trim().split(/\s+/).length;    // Naive token count based on whitespace splitting

              // Store the file name in the metadata before removing the key
              rec.Metadata["file_name"] = String.fromCharCode.apply(String, rec.Key);
              // Empty key, the database will generate a UUID for us
              rec.Key = StructuredData();

              rec.Payload.After = data;
              return rec;
            }

      # Create 3 clones of the first record to insert into other tables
      - id: clone-3-times
        plugin: clone
        condition: '{{ eq (index .Metadata "split.index") "0" }}'
        settings:
          count: 3

      # Prepare a clone for the 'files' table
      - id: prepare-files-record
        plugin: "custom.javascript"
        condition: '{{ eq (index .Metadata "clone.index") "0" }}'
        settings:
          script: |
            function process(rec) {
              rec.Metadata["opencdc.collection"] = "files";

              rec.Payload.After = StructuredData();
              rec.Payload.After["id"] = rec.Metadata["file_id"];
              rec.Payload.After["user_id"] = "${CHATBOTUI_USER_ID}";
              rec.Payload.After["description"] = rec.Metadata["title"];                        // This is the S3 metadata field "title"
              rec.Payload.After["file_path"] = "${CHATBOTUI_USER_ID}/foo.pdf"; // This is a placeholder for now, we don't upload the actual file
              rec.Payload.After["name"] = rec.Metadata["file_name"].split('/').pop();          // Use only the file name, not the whole path
              rec.Payload.After["size"] = 0;                                                   // TODO check if AWS provides file size in the metadata
              rec.Payload.After["tokens"] = 0;                                                 // Not sure how to calculate tokens for a file, so we set it to 0 for now
              rec.Payload.After["type"] = "application/pdf";                                   // We're only processing PDF files in this pipeline

              rec.Key = StructuredData(); // Empty key, the database will generate a UUID for us

              return rec;
            }

      # Prepare a clone for the 'collection_files' table
      - id: prepare-collection-files-record
        plugin: "custom.javascript"
        condition: '{{ eq (index .Metadata "clone.index") "1" }}'
        settings:
          script: |
            function process(rec) {
              rec.Metadata["opencdc.collection"] = "collection_files";

              rec.Key = StructuredData();
              rec.Key["file_id"] = rec.Metadata["file_id"];
              rec.Key["collection_id"] = "${CHATBOTUI_COLLECTION_ID}";

              rec.Payload.After = StructuredData();
              rec.Payload.After["user_id"] = "${CHATBOTUI_USER_ID}";

              return rec;
            }

      # Prepare a clone for the 'file_workspaces' table
      - id: prepare-file-workspaces-record
        plugin: "custom.javascript"
        condition: '{{ eq (index .Metadata "clone.index") "2" }}'
        settings:
          script: |
            function process(rec) {
              rec.Metadata["opencdc.collection"] = "file_workspaces";

              rec.Key = StructuredData();
              rec.Key["file_id"] = rec.Metadata["file_id"];
              rec.Key["workspace_id"] = "${CHATBOTUI_WORKSPACE_ID}";

              rec.Payload.After = StructuredData();
              rec.Payload.After["user_id"] = "${CHATBOTUI_USER_ID}";

              return rec;
            }
5: Run the Final Pipeline
You are now ready to run the complete pipeline.
- Source your environment variables:
source .env - Run Conduit:
conduit run --preview.pipeline-arch-v2 - Upload documents: Upload PDFs to your S3 bucket.
Note that you have to use the --preview.pipeline-arch-v2 flag when running
Conduit. This is because the pipeline uses the split and clone processors,
which are only available in the new pipeline architecture.
As Conduit runs, you will see new rows appearing in your Supabase tables:
files, file_items, file_workspaces, and collection_files. Open your
Chatbot UI. It will now have access to the documents processed by the pipeline.
You can ask it questions and receive answers based on the content of the PDFs,
with the system updating in real-time as new documents are added.
Congratulations! You have successfully built a powerful, real-time RAG system with Conduit.